Background:
I was converting some old MPG2 videos in to h.264 and noticed that it was excruciatingly slow process. I used HandBrakeCLI using the "Universal" profile on a Linux (Kubuntu 14.04LTS).
It took around 13 minutes to convert an hours worth of video on a Core i7-3610QM CPU @ 2.30GHz machine with plenty of RAM. Note that the FSB and RAM on this machine runs at 1600Mhz. I wanted to find out what bottleneck was. The three areas I had a look at was Memory, Processor and Storage.
The second problem was that the machine was getting very hot while processing with all 4 cores and the 4 hyperthreaded cores were utilised 80%+.
This article gives the results of this investigation.
Investigation:
Test 1:
HDD
5400RPM disk (sdb - root)
Cores
Default: 8 Cores (4 real + 4 Hyperthreaded)
Original File size
288MB MP2
6min 18 sec
Final file size
131MB h.264
Time taken
1m14.190s
1m14.500s
1m13.587s
Avg temperature (C)
51- 95
56 - 98
50 -91
~80% on all CPUs
Test 2:
HDD
ramdisk
Cores
Default: 8 Cores (4 real + 4 Hyperthreaded)
Original File size
288MB MP2
6min 18 sec
Final file size
131MB h.264
Time taken
1m13.793s
1m13.526s
1m13.537s
Avg temperature (C)
56 - 100
57 - 99
61 - 102
~80% on all CPUs
Test 3:
HDD
ramdisk
Cores
Default: 4 Cores
Original File size
288MB MP2
6min 18 sec
Final file size
131MB h.264
Time taken
1m45.909s
1m45.348s
1m45.609s
Avg temperature (C)
58 - 89
59 - 89
61 - 91
4x~80%, 4x~40%
Test 4:
HDD
ramdisk
Cores
Default: 3 Cores
Original File size
288MB MP2
6min 18 sec
Final file size
131MB h.264
Time taken
2m11.425s
2m6.620s
Avg temperature (C)
59 - 87
60 - 87
3 x ~80%, 5 x 40%
Test 5:
HDD
ramdisk
Cores
Default: 5 Cores
Original File size
288MB MP2
6min 18 sec
Final file size
131MB h.264
Time taken
1m28.516s
1m29.118s
Avg temperature (C)
59 - 95
61 - 96
5 x ~80%, 3 x 40%
Conclusion
As the results shows encoding with h.264 is processor bound. Amount of RAM or Hard drive performance really doesn't impact anything. However note that I said "processor bound"; which includes the speed of CPU, FSB, NorthBridge architecture (including motherboard), Cache and RAM speed.
As far as the secondary problem of CPU load/heat is concerned I found the best compromise was to use the maximum number of real processors for encoding (i.e.: only use 4, as there are only 4 real cores in my setup). Adding the 4 extra hyperthreaded cores gives about a 40% improvement in performance but the CPU runs red hot.
------------------------------
Further testing : What Handbrake options are best
Test A:
Handbrake Profile :
"Normal"
HDD
5400RPM disk
Cores
Default: 4 Cores (4 threads on Handbrake)
Original File size
1.4GB MP2
44min 12sec
Final file size
427.5MB h.264
Time taken
5m40.160s
5m45.726s
Avg temperature (C)
51-89
~73% on all CPUs
Quality (Playing using Kodi on Rpi)
55% - Fuzzy [ Fastest for given quality ]
Test B:
Handbrake Profile :
"Universal"
HDD
5400RPM disk
Cores
Default: 4 Cores (4 threads on Handbrake)
Original File size
1.4GB MP2
44min 12sec
Final file size
643.3MB h.264
Time taken
12m58.187s
12m35.263s
Avg temperature (C)
51-75
~70% on all CPUs
Quality (Playing using Kodi on Rpi)
65% - Some times edges trailing [ Best option for my TV recordings ]
Test C:
Handbrake Profile :
"H.264 MKV 1080p30"
HDD
5400RPM disk
Cores
Default: 4 Cores (4 threads on Handbrake)
Original File size
1.4GB MP2
44min 12sec
Final file size
302.7MB h.264
Time taken
16m54.927s
17m10.900s
Avg temperature (C)
51-91
~75% on all CPUs
Quality (Playing using Kodi on Rpi)
60% - Some times edges jurky
Test D:
Handbrake Profile :
"Very Fast 1080p30"
HDD
5400RPM disk
Cores
Default: 4 Cores (4 threads on Handbrake)
Original File size
1.4GB MP2
44min 12sec
Final file size
216.2MB h.264
Time taken
6m58.768s
Avg temperature (C)
65-92
~85% on all CPUs
Quality (Playing using Kodi on Rpi)
45% - Very fuzzy
Test E:
Handbrake Profile :
"Fast 1080p30"
HDD
5400RPM disk
Cores
Default: 4 Cores (4 threads on Handbrake)
Original File size
1.4GB MP2
44min 12sec
Final file size
319MB h.264
Time taken
15m4.535s
Avg temperature (C)
51-86
~80% on all CPUs
Quality (Playing using Kodi on Rpi)
51% - Fuzzy
Test F:
Handbrake Profile :
"HQ 1080p30"
HDD
5400RPM disk
Cores
Default: 4 Cores (4 threads on Handbrake)
Original File size
1.4GB MP2
44min 12sec
Final file size
475MB h.264
Time taken
31m10.414s
Avg temperature (C)
51-85
~65% on all CPUs
Quality (Playing using Kodi on Rpi)
65% - Fuzzier than Super HQ [For output size and processing time highly recommended]
Test G:
Handbrake Profile :
"Super HQ 1080p30"
HDD
5400RPM disk
Cores
Default: 4 Cores (4 threads on Handbrake)
Original File size
1.4GB MP2
44min 12sec
Final file size
558.2MB h.264
Time taken
92m51.622s
Avg temperature (C)
70-90
~55% on all CPUs
Quality (Playing using Kodi on Rpi)
80% - Good picture quality [ Close to source resolution ]
Saturday 23 April 2016
Saturday 6 June 2015
Green Power Co review
Introduction
I was looking to install a PV solar system and had done a lot of research, over a period of a month, in to panels, inverters and installation companies. My system requirement were:
- Good parts and warranty (Inverter, Panels and other components)
- Good installation
- Competitive price
- Customisable packages
- Local and Responsive installer
- Easy payment options
Pre-sale contact
I found Green Power reps to be hassle free and was not pushy like some of the other companies. They just needed few bits of information (i.e.: system size, address ..etc) to give me a quote. Questions I had were answered in a honest and forthright manner (and as an engineer by trade, I had lot of questions).
I wanted to visit and find out about the company and they made up time at short notice to meet me at their warehouse although they were busy preparing for a industry show. They gave me a tour of the warehouse and introduction to various components they used. Also provide information on a range of products they sell and comparative advantages of each. They also showed me the on-site testing facility they have to test various components like panels and inverters.
The sales person used a computer based program to analyse the orientation of roof surfaces and optimal setup for the solar panels. He provided me with PDF copies of the proposed installation, expected PV output during each month of the year, expected usage and expected savings.
Sale
Few weeks after the pre-sales contact, I contacted them for details finalisation. They answered all my technical and pricing question promptly and gave me a competitive price. A $600 deposit started the process and they allowed me to pay the remainder in 3 monthly instalments after the installation of the system. They also offered a 40 month payment plan with industry rates that I did not take up. Number of minor contract changes were promptly addressed. Green power also gave me realistic time-frames for the installation to happen (1 month).
Installation
Green Power operations team prearranged dates and times about a week before installation and was there on time (0800) on the day. It was a awful day with periods of rain, so the installer informed me that the job will not be completed on the same day. Green Power uses in-house CEC accredited electricians and they immediately identified where they can and cant install the inverter (i.e.: restrictions due to proximity to gas supplies and other surroundings).
They arranged for the completion of the installation a week later and had the installation complete by midday on the second day. Green Power installers were very professional around my family and kept to themselves. After the installation they gave me a full run-through of the PV system and answered all my questions.
Post installation and support
After the installation, Green Power arranged the electrical inspector within few days. After the inspection, the inspection paperwork were promptly sent to the power distributor. Green Power has been very responsive to all my post-installation technical and accounts queries since then.
Installation quality
According to the electrical inspector the job was very well done. From my point of view they made the installation a very good one by doing the extra things that highlights the workmanship and quality, such as:
- All DC cables were put through PVC piping or conduit to make sure they handled the harsh conditions of the roof and roof cavity and reducing the chance of rodent attack
- Added aluminium cover sheets to DC switches on the roof to prevent them from degraded early by the harsh sun
- Overall Neat installation
- Lead sheets were inserted to where the cables went in to the roof cavity
- Left the data (Ethernet) cables where I asked them to in the roof cavity
- Added silicon sealant to wall mountings to prevent water leak and pest protection
Room for improvement
Although their installation was very good, there are areas they can improve on:
- Cleaned up - They cleaned up all the big things but left some small cut cable pieces in the back yard
- Data cable seal - They missed putting in the rubber seal for the Ethernet cable connection on the Inverter (could be because the Conext RL ethernet board installation manual is not that clear on how to do this)
- Roof brackets - Their installation left minor vertical spaces between roof tiles (few millimeters gap) where the panel brackets went in to the tile planks. They could have made the roof tiles fit more flush against each other by grinding the tiles where the bracket go.
Summary
Green Power did a very good job and gave me enough information to make a informed choice. Highly recommend them to anyone looking to install a solar PV system. At present, the system produces more power than predicted but will have to see on long term basis how it behaves.
Their web site:
Green Power Co
Installation pictures

Inverter, DC and AC isolation switches

Silicon sealing of Isolation switches

Primary string (In winter, couple of hours a day, it gets shade from a neighbours tree)

Secondary string
Room for improvement pics:

A lifting tile (One of the bad once)

Components used
- Schneider Conext RL5000E inverter
- PhonoSolar 250W pannels
- Grace Aluminium Racketing Kit
- Benedict DC isolation switches on the roof
- Contek MCB's in a Suntree housing near the Inverter
- TradeSave AC isolation switch near the Inverter
Discussion
Whirlpool discussion
Thursday 11 December 2014
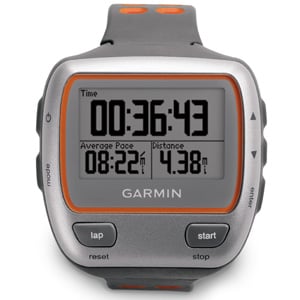
Tips and tricks to solve Garmin GPS Watch upload issues (Forerunner 310XT)

** Images are copyrighted by their owners
I use a Garmin Forerunner 310XT GPS watch to track my endurance workouts (running, cycling and walking). I use it with a heart rate monitor and a footpod. It is a great watch most of the time. However, once in a blue moon, it has issues. This article describes some of these issues and how to avoid and/or fix them.
Typical user work-flow for the watch is:
1. Do workout (watch records the workout)
2. Connect watch to computer using a Ant wireless comms dongle
3. Upload the workout to computer. Depending on the settings it will auto update to the "Garmin Connect" cloud service.
Problem 1: Does not auto-connect to computer
Symptom: Watch refuses to auto-connect When the Ant stick is plugged on to the computer.
Cause: Unknown.
Workaround: Re-pair the watch to the Garmin Ant Agent on the computer.
Probable causes (Anecdotal):
1. A setting on the Garmin watch has been overwritten or corrupted causing the pairing information to not persist.
2. Older Garmin Ant-agent program on the PC is buggy.
Fix that really works: Install the new "Garmin Express" software. It works like a charm and has a "Sync" button for good measure.
Probable other fixes: Reset the device to factory settings (WARNING: Note that all your workout history will be deleted from the watch if you do this)
Problem 2: Fails upload of workouts after connection
Symptom 1: Fails upload of workouts at various stages for unknown reason
Symptom 2: "Garmin Express" or "Garmin Ant Agent" freezes or terminates abnormally in the middle of uploading
Cause: Corrupted workout data.
Details: I had this happened to me multiple times after letting the battery run dry during a workout. Watch complained that the battery was low and then automatically turned itself off. This seems to corrupt the workout record. After recharging, subsequent workouts works fine. However the problem starts when I tried to upload all the workouts. Uncorrupted workouts starts uploading as normal, however during uploading of the corrupted workouts it fails with the aforementioned symptoms. Sometimes the "Garmin Ant Agent" attempts a reconnect but this reconnect never succeeds and ends up in a never ending loop.
Fixes: Figure out which workout is corrupted by viewing each workout on the watch carefully. Corrupted workouts would have missing laps, GPS or other data. Manually erase the workout from the watch. Now you should be able to upload the other workouts as normal.
Problem 3: Uploaded data incorrect
Symptom: Heart-rate or footpod data tapering off
Cause: Batteries on the Heart-rate monitor or footpod is running low
Fixes: Replace battery on the Heart-rate monitor or footpod
Problem 4: Unnaturally high heart rate shown
Symptom: Heart rate displayed and recorded on the watch is abnormally high. I have seen 265bpm.
Cause: Unknown.
Probable causes (Anecdotal and from internet research):
1. Clothing that generates large amount of static such as synthetic clothing
2. Poor connection of the Heart rate monitor electrodes to body
3. Incorrect electrode positioning
4. Low Heart rate monitor battery level
Probable fixes:
1. Isolate heart rate monitor from clothing that generates static. Another option will be to wear skin tight clothing so as to reduce static generated by flapping cloths. Although water on clothing has helped some people I did not find this.
2. Get a better heart rate monitor
3. Tighten the heart rate monitor to your body better.
4. Ensure that the electrodes are at their right place (chest bone under your breast, slightly left)
5. Replace heart rate monitor battery
6. Put some water or electrode gel on the electrodes so that they make a good contact with your body.
* I also like the solution by solution-to-heart-rate-dropoutsspikes.html :). I finally decided to give it a try with a US$15 Polar strap from Amazon. It works like a charm and I get the heart rate I expect from the watch now.
Problem 5: Watch freezes just after starting a workout
Symptom: Watch freezes just after starting a workout
Cause: Unknown.
Probable causes (Anecdotal): Corrupted previous workout
Probable fixes: Do a soft reset of the watch by holding the "mode and lap" keys
Problem 6: Initial GPS values on workouts are wrong
Symptom: Initial GPS values after starting a workout is non-existent or wrong.
Cause: GPS fix has not been achieved by the time the workout started
Fixes: Wait for a proper GPS fix before starting the workout. It may take up to 3 minutes depending on the weather, cloud conditions, relative elevation of surroundings and overhead cover.
Problem 7: Cannot delete corrupted workout
Symptom: Corrupted workout cannot be deleted even after repeated attempts.
Probable Cause: Watch firmware is temporary in a confused state
Fixes: Power down the watch, wait for 20 seconds, then power it back up and try again.
Problem 8: General instability
Symptom: Combination of above problems 2, 5 and 7. Another symptom is more than 1% of workout storage is used even when all the workouts are deleted from the device.
Probable Cause: Watch data storage is fragmented and/or corrupt.
Fixes: Do a Master reset of the device using procedure described at Hard Reset
or : (WARNING: This will erase all your watch settings and data)
- Power Forerunner off
- Press and hold Enter and Mode buttons
- Press and release Power button
- Press and release Lap/Reset (watch will power off)
- Wait 3 seconds
- Release Enter and Mode
Conclusion:
310XT works perfectly most of the time. When it doesn't these workarounds generally work well.
Saturday 16 August 2014
Accessing hardware registers in userspace using memmap in Linux
Introduction:
If you want to access hardware registers in Linux userspace you can use the following example to explore access. However if I recommend creating a Linux Device Driver if you want to do this properly.
Note that this is an advance Linux topic, so please do NOT try this first in a production system.
Example:
Full man can be found at
http://linux.die.net/man/3/
Example:
/*
* Maps real memory address to a virtual address. The virtual address
* then could be used to read/write the real memory as if it was
accessed
* directly.
* Adapted by Janaka Subhawickrama. Copyright 2007.
* GPL software.
*/
#include <stdio.h>
#include <errno.h>
#include <string.h>
#include <fcntl.h>
#include <sys/ioctl.h>
#include <signal.h>
#include <sys/mman.h>
#include <stdlib.h>
#include <termios.h>
#include <unistd.h>
//Virtual address that is associated with the physical address
static char *regmap_addr = NULL;
//The following is the physical address of memory mapped registers of
the CPU
#define REGISTRY_MAP_ADDRESS_OFFSET
#define REGISTRY_MAP_SIZE
#define GPIO2_DATA_DIR_REG_OFFSET
#define GPIO2_DATA_REG_OFFSET
#define GPIO2_DONE_PIN
#define GPIO2_FAULT_PIN
#define GPIO2_PROGB_PIN
int main(int argc, char *argv[])
{
int devmem; // this is the "/dev/mem" descriptor
//Registers of the CPU I am using is 32bit
volatile unsigned int uiGet;
volatile unsigned int *ptmp = NULL;
//On embedded systems you may have to mknod /dev/mem
printf("\nOpening /dev/mem");
devmem = open("/dev/mem", O_RDWR | O_SYNC);
if (devmem < 0)
{
printf("\
strerror(errno));
return -1;
}
printf("\nMapping Memory mapped registers at %08X with size %08X",
REGISTRY_MAP_SIZE, REGISTRY_MAP_ADDRESS_OFFSET);
regmap_addr = (char *)mmap( 0, REGISTRY_MAP_SIZE, PROT_READ|
PROT_WRITE, MAP_SHARED, devmem, REGISTRY_MAP_ADDRESS_OFFSET);
if (regmap_addr == (char *)MAP_FAILED)
{
printf("\
close(devmem);
return -1;
}
//Now you can write to CPU registers as if you were from a boot
loader
//Setup directions of GPIO pins
*(volatile unsigned int *)(regmap_addr + GPIO2_DATA_DIR_REG_OFFSET) =
GPIO2_FAULT_PIN | GPIO2_PROGB_PIN;
//Turn some GPIO Pins on
*(volatile unsigned int *)(regmap_addr + GPIO2_DATA_REG_OFFSET) =
GPIO2_FAULT_PIN | GPIO2_PROGB_PIN;
//Get some values of GPIO lines
uiGet = *(volatile unsigned int *)(regmap_addr +
GPIO2_DATA_REG_OFFSET);
printf("\nGPIO register %08X", uiGet);
//Cleanup
munmap((void *)REGISTRY_MAP_ADDRESS_OFFSET, REGISTRY_MAP_SIZE);
close(devmem);
return 0;
}
More comments and caveats can be found at:
https://groups.google.com/forum/#!msg/comp.os.linux.embedded/kOKNHeMGg58/pTY-jLMFu_gJ
Toshiba P870/027 (PSPLBA-02700S) review
Specs:
Core i7-3610Qm, 16GB (1600MHZ) RAM, 64-bit Windows 7, 1920x1080 Display, Intel 4000 HD + a 2GB Nvidea GT 630M video card, Blu-ray burner, 4 x USB 3.0 ports, Bluetooth 3.0, Wireless b/g/n, HDMI and VGA out, 1Gb/s Ethernet, DVB-T TV card, HD webcam
Look and feel:
The pictures on the Toshiba site does not do justice to this laptop. It looks and feels much more sexier than what the picture tells. Entire non-functional surfaces of the laptop feels like its an aluminium or a metal alloy. It is NOT plastics painted to look like metal.
Size :
It is thin, but wide and long. It feels like Toshiba could have done some more compacting given the wasted real-estate. It might be a bit too big to lug around if you are a frequent traveller.
Screen:
First class. Vibrant and bright. Good refresh rates. More than reasonable viewing from extreme oblique angles. Good for watching movies. But I haven't tried playing games yet.
Playing blu-rays:
Smooth when on power pack (did not test on battery). Apparently can play 3D Blu-ray via HDMI to a TV.
TV tuner:
Antenna connection mostly needed. Excellent tuner. Great reception quality. Even tuned on to hard to get analog TV channels. Got 34 channels in Melbourne including digital radio channels.
Touchpad:
Has scroll bars and gestures. Very impressed with the smoothness and detection of gestures. It just works (Pinch/zoom, rotate, scroll vertical and horizontal). The touchpad buttons could have been better.
Sound:
Harman/Kordon sound. Excellent quality. Good base and loudness. Good internal mic.
Camera:
Average quality capture. Clumsy application.
HDDs:
1.5GB (1 + 0.5) good size 5400RPM. Its good for battery life, but It would have been much better if it was 7200RPM. Has good HDD vibration protection.
Comms:
Ethernet and wireless-n works like a charm. Did not try bluetooth yet. All the connection settings for all network cards are centralised using a Toshiba Comms applet which is intuitive and easy to use.
It has a RTL8723AE. Pretty good when used with the Windows 7 drivers.
However awful Linux support. Still waiting for a stable Linux driver (even in 2014).
Keyboard:
Toshiba could have done much better in this department. Most keys are large; except for function keys, small space bar and tiny (half-size) arrow keys. Good size number pad. Keys feel plasticky and push buttony, but can get used to it. There is a keyboard back-light (IMO bling) that can be turned off. Keyboard as a whole is not too bad to use if you get used to using the number pad as arrow keys. IMO tiny arrow keys are worst part, specially for SW development.
SD card slot:
Works well but does not have a dust cover
Battery life:
Bit disappointing. Just over 3hr when using default profiles.
Heat dispersal:
Excellent
Default software:
OS is Windows 7 Home Premium (should really have been Windows 7 Pro). Nice features like plug-in USB stick backups (Like the Mac) called Clickfreebackup. There is a reasonable Blu-ray/DVD burning software and some other Toshiba specific apps that can be useful.
Linux Compatibility:
Works great with Kubuntu 12.04 live CD. I think it will work much better when natively installed with BumbleBee (Linux version of NVIDIA Optimus). Can't wait to install it.
Overall very happy and well worth the price I payed at JB HiFi ($1545 + 20% for full 3 year warranty on 2012-Jun-22).
Friday 15 August 2014
Tips and tricks to improve your VmWare VM performance
Problem:
I run various virtual machines on VmWare Player (6.0.3) running on K/Ubuntu 14.04 on a Core i7 laptop. I get terrible performance on all virtual machines I run regardless of the guest operating system I run (Win7-64, WinVista, WinXP, Linux). Issues:
Solution:
After various failed attempts I found the following combination of optimisations to worked best with the setup I have:
Trials that failed:
If you want to substantially improve the performance of your guest VMs, following will give you a good head start:
I run various virtual machines on VmWare Player (6.0.3) running on K/Ubuntu 14.04 on a Core i7 laptop. I get terrible performance on all virtual machines I run regardless of the guest operating system I run (Win7-64, WinVista, WinXP, Linux). Issues:
- Slow to start from suspension
- Freezes occasionally for up to 30 seconds.
- Seems to thrash the hard drive when running
- Slow to suspend
Solution:
After various failed attempts I found the following combination of optimisations to worked best with the setup I have:
- Move VM: Move the VM to another hard drive away from the hard drive that runs the Host system. Preferably move it to a higher performing HDD (i.e.: 7200RPM or 10000RPM). What seems to happen is that during certain times, the Host system tries to access the HDD (presumably to access VMware libraries) as the same time as the Guest OS. This results in HDD trashing and very poor performance. Sometimes even the Host seems freeze when this happens. By moving the VM to a seperate hard drive we remove this bottleneck. Even USB HDDs seems to perform better when the Guest was moved to it rather than having the Host and the Guest on the same 5400RPM HDD.
- Use the amount of RAM recommended by VMware: Using more than the recommended amount of RAM on the VM seems to have no improvement on the system performance of the Guest. I have read some posts which say that the Guest performance can even be decreased by having more RAM on the VM. I personally have not seen this effect.
- Turn 3D acceleration off: Enabling 3D acceleration seems to thrash the HDD more frequently and did not visually provide any improvements. Turn it off if you are not using 3D acceleration.
- De-fragmenting the VM hard drives: Marginally improved performance was noticed when using de-fragmented VM hard drives.
- Do not allocate more than 2 virtual cores (vCores) to the Guest VM. Adding more cores may actually slow the Guest and Host PCs down if the specific application you are running is not designed to take advantage of SMP. See IssueWithMultipleCores.
Trials that failed:
- Running"Bumble bee" graphics acceleration on the Host and enable the VM 3D acceleration. Actual performance seems to degrade slightly with this setup.
- Hacking the VMX files to optimise different option. There was slight improvement of the performance of the VMs but it was not significant.
- Recently discovered that having a Bridged mode network connection occasionally degrades the VM performance for about 5 seconds. The reason is currently unknown (Possibly NetBios announcements causes some extra processing). Things seems to get better longer you keep the VM Open.
- I have noticed that when the VM is first starts up, from cold boot or from a suspended session, everything seem to be slow for about a minute. Even mouse moves and clicks seems slow. Then it gets better and stays better. My hypothesis is that:
- Host machine loading the guest RAM in to real RAM (from paged memory) takes time
- There is some sort of caching that helps performance.
If you want to substantially improve the performance of your guest VMs, following will give you a good head start:
- Move the VM to another HDD (Preferably to a higher performing HDD)
- Set the guest RAM to VmWare recommendation.
- Turn 3D acceleration off if you are not using it
- De-fragment your virtual disks from within the VM as well as from the VmWare Player tools
Subscribe to:
Posts (Atom)
I picked this book up as an experience embedded software engineer who wanted to explore and learn about Linux device drivers. With a background in real-time embedded software development(with some RTOS experience) and years of Linux/nix user/developer experience this book nicely matched my learning path.
Layout of the book:
The chapters are layed out in a logical and incremental fashion where introductory chapters stick to the big picture stuff while later on chapters delve deep in to the internals.
Contents and Examples:
Book takes the approach of explaining the subjects in concise manner with examples and interesting incite. However the code examples in many cases are incomplete, and duly so. I say this because the lot of examples, in their entirety, are provided on their web/ftp site.
Currentness and compatibility:
The book uses x86 as its platform and for its examples. I found some minor differences in API interfaces on other platforms(i.e.:PPC). Also some of the latest kernels have altered some of the APIs slightly.
For who:
In my opinion this book is for software engineers/developers who has experience in C and Makefiles. Any embedded development experience will help understand why things are done the way they are and the deeper issues of concurrency and timing.
Conclusion:
This book is the benchmark for Linux device driver books. It is well set out and a easy read. To get the maximum out of the book you will need to play around with the examples/ideas that are covered in this book.